The Mother of All Size Charts

Cobbled this up over the last couple of days using the silhouettes created by Telecanter.

Click to see full size and enjoy!

EDIT: Made some adjustments to the chart, and I added a storm giant and gelatinous cube. I was way off on the wyvern, the giants needed some tinkering and my treant was too big. Of course, sizes vary. I might do some more work on the sea critters as well.


On a side note – the print copy of NOD 12 is now up for sale at Lulu. Sorry it took so long – wanted to make sure it came out okay. 144 pages for $11.00. Map of Hell still didn’t reproduce as well as I would like, but you can still grab a better looking version HERE.

Give the Hollywood Lawyers What They Want …

… and stop talking about Hollywood’s intellectual property.

Instead, you can give all that free publicity to me! 

Come on – NOD, Pars Fortuna, Mystery Men!, Mutant Truckers, 1800-American Empires, Blood and Treasure, Space Princess, Cave Brawl, Greatsword, Action X, Queen and Kaiser … I have tons of content, and I won’t shut down your blog if you use any of the original art from it that I’ve posted – so long as you credit the artist and give me a link back.

And it doesn’t have to be me or my nonsense. I’m sure other small creators of games, independent movie and entertainment producers and craftspeople like the folks at Etsy would like the free publicity as well. Instead of buying yet another t-shirt with Batman on it, buy somebody’s groovy creation at Cafe Press. Instead of watching the latest Hollywood big budget sci-fi or fantasy film … well, actually, you probably just shouldn’t watch that crap period.

Allow SOPA/PIPA to bite Hollywood and the whole Entertainment Industrial Complex so deservedly in the ass and stop talking about them and their content. If they want to take their ball and go home, let them. We can have plenty of fun without them!

Illustration by Jon Kaufman, from the upcoming release of Blood and Treasure

OSR Conservation / Best Thing I’ve Seen Today

1. OSR CONSERVATION
If you haven’t already, you might want to check out the OSR Conservation project. Basically, folks like me can upload some of the gaming stuff we’ve created to make sure it is preserved even if we disappear from the face of the earth. I’ve just uploaded NOD 1 and NOD 6, as well as the basic rules for Pars Fortuna.

There are many other things to download there, and if you have something you would like to upload, by all means do so!

2. BEST THING I’VE SEEN TODAY
On a side note, just saw this piece of work on DeviantArt …

http://backend.deviantart.com/embed/view.swf?1
Thor by ~Andrew-Robinson on deviantART

Best thing I’ve seen today. Simple, clean and powerful.

Hell – Abaddon Preview 1: Overview

The wind and rain swept circle of Erebus gradually gives way to Abaddon. Unlike the mile high clffs that separate Asphodel and Erebus, the border between Erebus and Abaddon is a more gradual, though slippery, slope.

In Abaddon, the constant rain of Erebus becomes slowly falling flakes of snow. This snow, unfortunately, is not pristine and white, but rather raw sewage in snow form. These putrid flakes fall from the sky and collect between great hills in the form of slush. The slush is rarely more than a foot or two deep, though sometimes it hides deeper pits that are home to otyughs. In places, these slowly moving rivers of sludge are clogged by bulrushes.

Mulling through this sludge are the damned souls of Abaddon. No longer shades, they have been transformed into great, bloated humanoids with faces suggesting swine. These swine-things roam through the muck, rooting in it for bits of more solid waste, which they devour as though it were truffles or some other fabulous viand. The swine-things are slow moving and pay little attention to folk unless they catch the scent of food or drink. They mostly serve as prey for the devil dogs that roam Abaddon.

The hills of Abaddon are not much better. They are slick and slimy in some places and covered with growths of stinkweed, stinking wattle, black horehound, poison hemlock, thorn-apples, devil’s dung, stink grass, skunk cabbage, wild mandrake, chokecherry and poisonous sumac. Amidst the mud and the plants there are great heaps of broken crockery and glass and rusted tools and weapons – all irreparable and long forgotten. Most of these hills are inhabited by the Abaddonites.

Miasma of Entropy
Abaddon is not just disgusting, it is catching. A miasma of entropy covers this circle, affecting everything unfortunate enough to have entered it.

Each living being traveling in Abaddon must pass a saving throw each day or succumb to a disease (see below). This save must be made each day, with a new disease being added to the victim’s repertoire each time they fail.

Objects must likewise save each day or fall into disrepair, as if by magic. Each time armor fails a save, it’s armor value is reduced by one. Armor with a value of +0 simply falls apart. Weapons have their damage dice reduced by one size (i.e. 1d10 to 1d8, 1d8 to 1d6, 1d6 to 1d4, 1d4 to 1d3, 1d3 to 1d2, 1d2 to 1, 1 to 0), with the weapon falling apart when its’ damage potential falls to 0. Glass and stone items become dirty and grimy, cloth items become frayed, then tattered, then useless, metal items become tarnished or rusted, then pitted and then useless, etc.

Characters that dawdle too long in Abaddon may soon be naked, weaponless and wracked with disease.

Races of Abaddon
Abaddon, like most of the other circles of Hell, is not only inhabited by pitchfork-carrying devils and their victims. Three races known to people of the surface world dwell in Abaddon, though these races have been changed in many ways by their habitation in Hell.

Goblins: The goblins of Abaddon are scurrilous little squabs with fat, red faces and gleaming white eyes. They are junk collectors who carry large packs filled with all manner of useful and useless items. Any tool they have that is in working order is bound to carry some manner of curse. Abaddonite goblins have acidic saliva and, once per day, can summon and command 1d12 giant rats.

Orcs: Orcs, being creatures of gluttony, are eminently suitable for Abaddon. The orcs of Abaddon have piggy faces and grotesque, bloated bodies. Their skin is pale and blotchy and their eyes are pink. Abaddonite orcs are immune to disease and poison and have the paralyzing touch of ghouls (save at +3 to negate). When they paralyze or fell a foe, they usually fall to devouring them.

Troglodytes: Like the troglodytes of Nod, the troglodytes of Hell dwell underground, burrowing into the muddy hills and the bedrock beneath them. They have bilious green scales and fan-like crests that run from head to tail. The odor of the troglodytes of Abaddon is so foul that those within 10 feet of them not only suffer the normal penalty but also fall to vomiting until they pass an additional save, which they may attempt once per round.

Lords of Abaddon
Abaddon is ruled by Beelzebuth, who takes the form of a great fly. He sits at the center of all the intrigues of Abaddon and many of the intrigues of Hell as Lucifer’s chief rival and most bitter enemy. Under his dominion are the lords Demoriel and Behemoth (who is usually away from his domain in Abaddon serving as butler in the palace of Lucifer in Dis). The primal demon lord Jubilex also dwells on Abaddon, though he pays no tribute to Beelzebuth. The terrible three-headed hound Cerberus also roams Abaddon.

Deviant Saturday – Manarama Edition

Manarama does lots of great work in a loose, free, fun style. Now, I’ve been notified by some readers that embedding the images via DeviantArt is a problem in some mobile devices. For that, I apologize. However, I want to be careful about copyright and proper attribution, so I’m going to stick with the embed codes for now.

Cave Brawl – The Rules

Rules of Play

Flip a coin to determine which team starts out with the ball – or simply discuss and come to a decision. The team with the ball is the offense, the team without the ball is the defense.

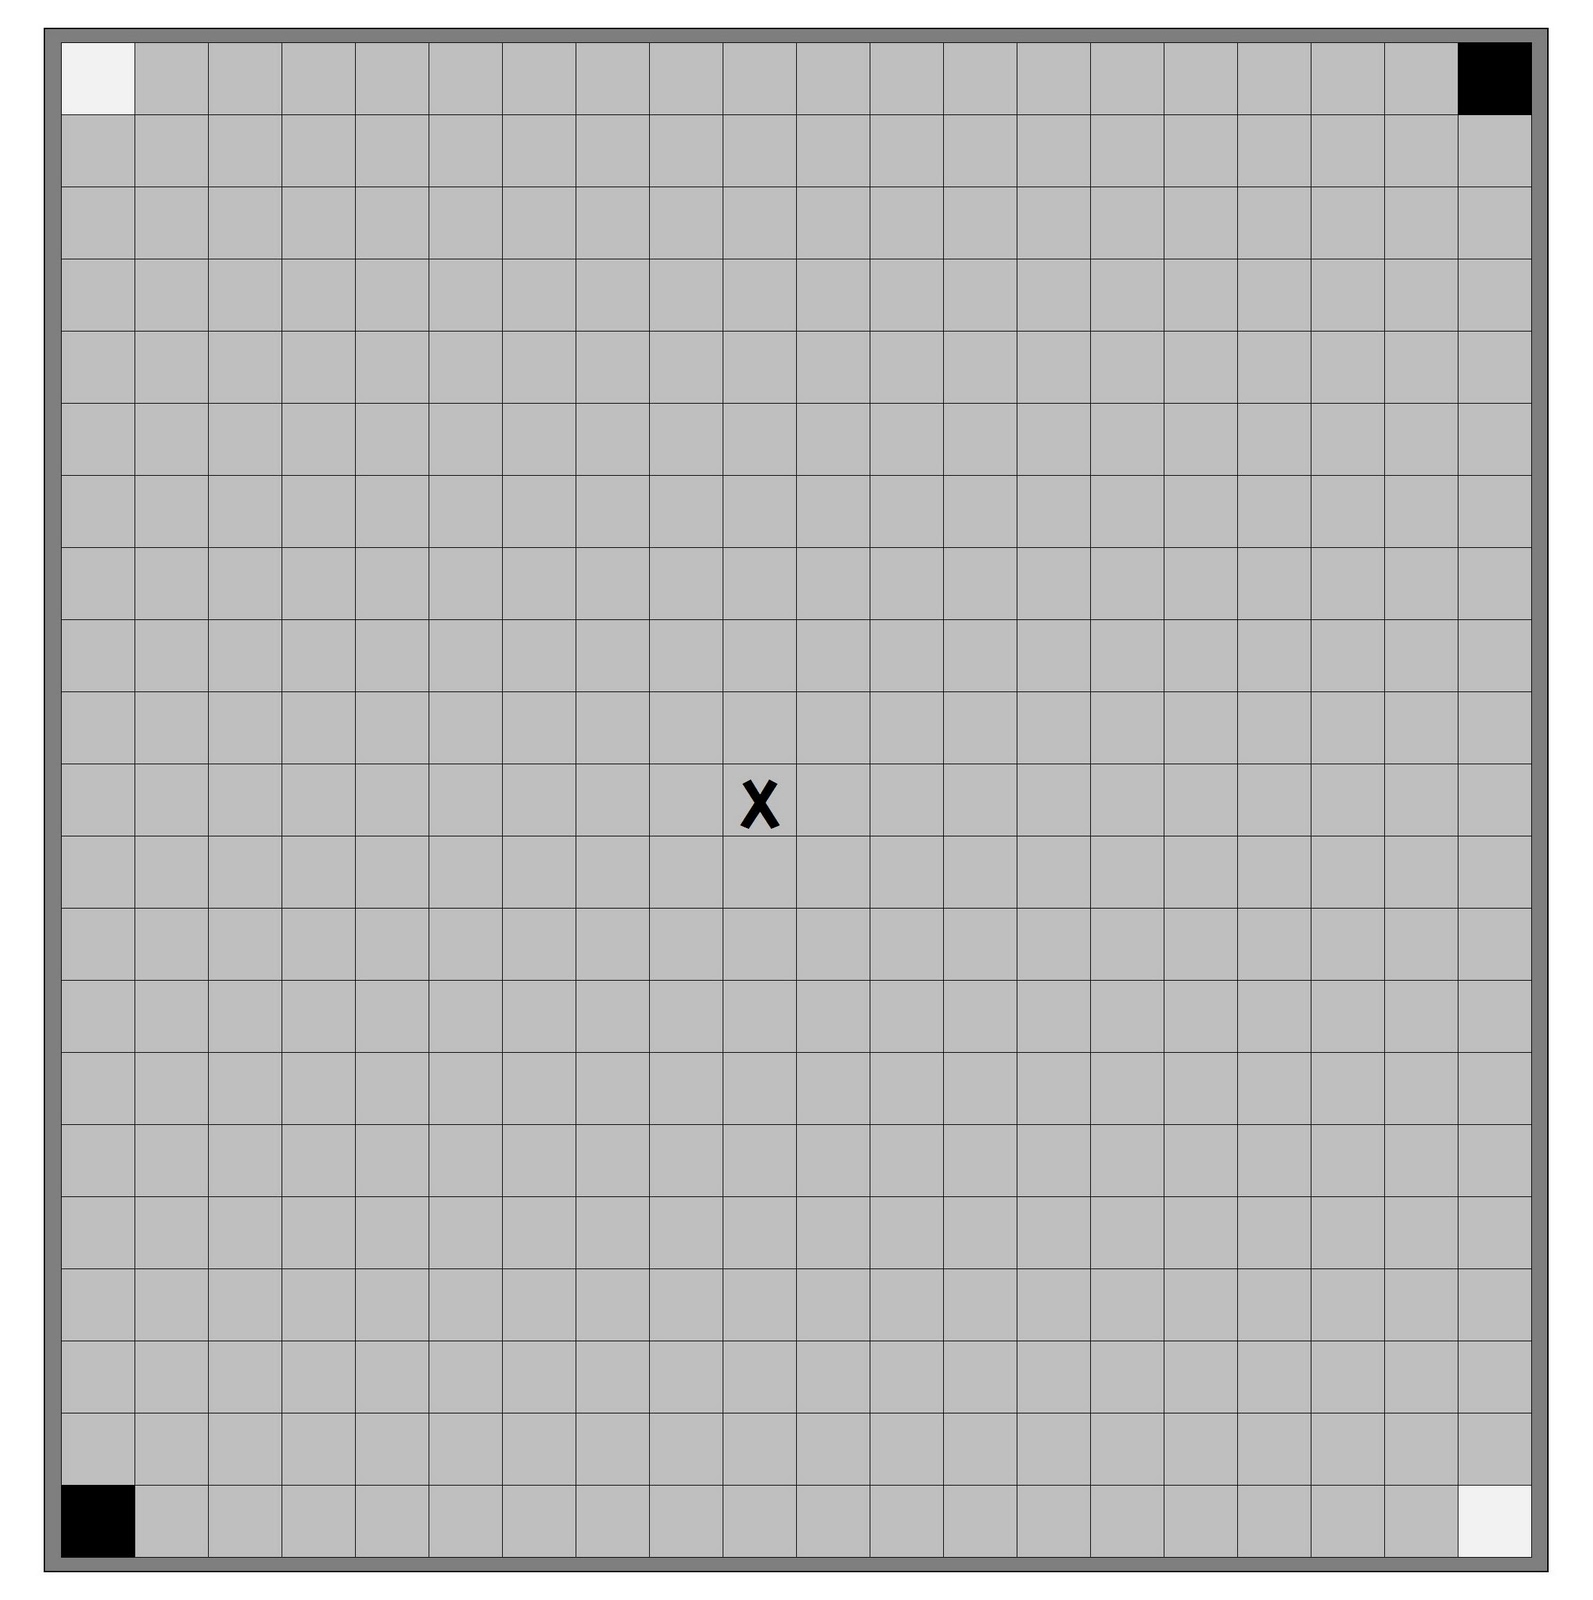
The defense coach moves first. All of the players begin the game in the “tunnel” leading to the playfield, and thus each one must be moved from their goal cave. The light colored square counts as the first square of their movement.

Play proceeds in turns. The defense coach makes the first move, then his opponent, and so on.

On a coach’s turn, he may move all of his players.

A player can move as many squares as they have movement points and take one action. A player that has been knocked down can stand up and take one action, but cannot move.

All actions are resolved by comparing one of the attacker’s ability scores to one of the defender’s ability scores to derive a modifier. If the attacker’s score is higher, then the modifier is a bonus equal to the difference between the two scores. If the defender’s score is higher, then the modifier is a penalty equal to the difference between the two scores. The attacker rolls 1d20 + the modifier to resolve the action. If the roll is equal to or greater than 10, the action is a success. If not, the action is a failure.

The following actions can be attempted in Cave Brawl:

Block: A block is an attempt to push an adjacent opposing player. Compare the blocker’s BT score to the defender’s BT score to derive the modifier. If successful, the blocker may move the defender one square in any direction. If they have any movement left, they can follow up an end the turn adjacent to the defender. The victim of a successful block suffers 1d6 points of damage. Deduct this from their hit point total. If the roll is a failure, the blocker’s turn is over.

Tackle: A tackle is an attempt to knock an adjacent opposing player over, forcing them to drop the ball. Compare the tackler’s BT score to the defender’s BT or CD score (whichever is higher). If the tackle is a success, the defender is knocked down and loses 2d6 hit points. If they were carrying the ball, it bounces into an adjacent square chosen by the defender. If the tackle is a failure, the tackler is knocked down in the square they occupy and loses 1d6 hit points.

Pass: A pass is an attempt to throw a ball from a passer to a receiver. Compare the passer’s PK score to a difficulty class (DC) based on the range of the attempted pass. For each opposing player adjacent to passer, the d20 roll suffers a -1 penalty.

Short Range (1-5 squares) = DC 4
Medium Range (6-10 squares) = DC 8
Long Range (11-20 squares) = DC 12

If the pass is successful, it is on target and the receiver may attempt to catch it and then move. If the pass is a failure, it lands 1d6 squares away from the receiver, placed by the passer’s opponent.

Catch: This is the attempt by a player to catch a ball that has been passed to them. Compare the receiver’s CD score to the same DC as for the original pass. For each adjacent opposing player, the d20 roll suffers a -1 penalty. If successful, the receiver now holds the ball and can move their allotment of squares. If the catch is failed, the ball is placed one square away from the receiver by the opposing coach.

Kick: Kicking works as passing. The ball is aimed at the tiny hole above the goal tunnel of the opposing team. A successful kick instantly ends the game in victory for the kicking team. The DC of the kick is determined by range, measuring from the kicker to the goal square. For each opposing player adjacent to kicker, the d20 roll suffers a -1 penalty.

Short Range (1-5 squares) = DC 14
Medium Range (6-10 squares) = DC 17
Long Range (11-20 squares) = DC 20

If the kick is a failure, the ball is placed 1d6 squares away from the goal square by the opposing coach.

Pick Up Ball: A ball that is loose on the ground can be picked up by a player. The player must move to the square containing the ball and pick it up. That player’s movement ends in that square.

Scoring
A team that scores a goal by kicking wins the game automatically.

By moving the ball into the opponent’s goal square, a team scores one point. The first team to score an agreed upon number of points (3 can be considered the default) wins the game.

When a point has been scored, the ball is given to the opposing team and play begins again with each team in their goal tunnel. As always, play begins with the defender.

Keep It Moving
Ungawa demands action! If the offense (i.e. the team with the ball) has not moved the ball for two turns, Ungawa’s priests release one of the following terrors from their animal pits. Roll 1d6 to determine the beast:

.nobrtable br { display: none }

Roll Beast POW DMG MV
1 Stirge Swarm 2 1d6 4
2 Smilodon 6 2d6 6
3 Stegosaurus 8 3d6 5
4 Giant Snake 4 1d6 6
5 Mastodon 10 3d6 5
6 Pteranodon 4 1d6 7

Special: The victim of a pteranodon attack must roll 1d6. On a roll of “1”, they are picked up and carried off the field of play, never to return. The victim of a giant snake attack must roll 1d6. On a roll of “1”, they are constricted and unable to move until they make a successful Block attack against the snake. Each round they are constricted, they suffer automatic damage. The victim of a stirge swarm attack must roll 1d6. On a roll of “1”, they lose one point from each of the ability scores (BT, CD and PK).

The released animal either emerges from the left cave or right cave (flip a coin). It heads towards the nearest player on the team that has failed to advance and attacks. After that, the animal moves toward and attempts to attack (if it moves far enough) the nearest player from either team. The animal does not leave the field of play until a point is scored or the animal is killed.

To attack, compare the beast’s Power value to the defender’s BT or CD (whichever is higher) and roll 1d20 as normal. The type of beast determines the number of hit points the player loses on a successful attack. The beast rolls a number of 1d6 equal to its Power value to determine its hit points.

Attempts to block or tackle a beast are made by comparing the attacker’s BT to the beast’s Power value.

League Play
League play can be accomplished by forming a number of teams and then having each team play each other team, recording wins and losses, during the season and allowing the two teams with the best win-loss records play a championship at the end of the season.

Alternatively, you can put the teams in brackets, allowing them to play an initial round of games, the winners playing each other in successive rounds until only two teams remain.

Players that do not survive a game are replaced by new players for the next game. Each player that survives a game can improve one of their ability scores (BT, CD or PK) by +1. No ability score can be improved higher than a score of “8”.

Cave Brawl – The Teams

As mentioned in the last post, Cave Brawl is played by two teams of nine players each (yeah – you can do 7 or 11 or whatever – don’t sweat it). There are five different factions (well, four really) that compete in the games. Coaches pick a faction and choose their player types and then roll stats for those individual players. Each team has to have at least five players of the “basic” type – i.e. an Amazon team has to have at least five amazons, the other four positions can be “special” players.

Each of the four main factions (I know I said five before – just keeping reading, you’ll see what I mean) has three player types each. Each player has five statistics to keep track of:

Block and Tackle (BT): This measures the player’s overall strength and ability to shove others around.

Catch and Dodge (CD): This measures the player’s overall agility, quickness and hand-eye coordination.

Pass and Kick (PK): This measures the player’s ability to put the ball where they want.

Move (MV): This is the number of squares the player can move each round.

Hit Points (HP): This is the amount of injury a player can take before they are removed from play. A player has 1d6 hit points for every point of “Block & Tackle” they have.

For each player, roll 1d6 to determine their BT, CD and PK scores, modifying the roll for the player type (see tables below). Once the BT is determined, roll for HP. A player’s MV score is determined by their player type.

THE TEAMS

AMAZONS
The amazons are fierce woman warriors from the dinosaur-infested jungles. They are quick, agile and bloodthirsty.
.nobrtable br { display: none }

Player Type BT CD PK MV
Amazon (Basic) +0 +0 +0 5
Acrobat (Special) -2 +2 +0 6
Queen (Special) +0 +0 +2 5

Special: Acrobats have the ability to vault over opposing players. An acrobat can move to a space adjacent to an opposing player and attempt a DODGE roll (see tomorrow’s post for how you do this). If successful, place the acrobat on the other side of the opposing player and allow her to continue her movement.

CAVEMEN
The cavemen and their ape allies dwell in the hills. Frankly, they mostly show up in hopes of tackling some amazons.
.nobrtable br { display: none }

Player Type BT CD PK MV
Caveman (Basic) +0 +0 +0 5
Cave Ape (Special) +2 +0 -2 4
Monkey (Special) -2 +2 -2 5

Special: For an opposing player to attempt to BLOCK or TACKLE a cave ape, they must first test their courage by roll 1d6. On a roll of “1”, they quake in fear and lose their turn.

REPTILIANS
The cold-blooded reptilians venture up from their super heated vents beneath the ground to show their dominance over the pathetic mammals.
.nobrtable br { display: none }

Player Type BT CD PK MV
Lizard Man (Basic) +1 +0 +0 4
Kobold (Special) -2 +3 +0 3
Troglodyte (Special) +2 +0 -2 4

Special: Troglodytes are surrounded by a terrible stench. Any opposing player beginning their turn adjacent to a troglodyte must roll 1d6. On the roll of a “1” they are too busy retching to take a turn.

WITCHDOCTORS
The witch doctors and their sorcerous spawn are not about to let a bunch of mundane warriors be Ungawa’s favorites. It’s a matter of witchdoctor pride!
.nobrtable br { display: none }

Player Type BT CD PK MV
Zombie (Basic) +2 -2 -2 3
Goblin (Special) -2 +2 +0 4
Witchdoctor (Special) -2 +0 +0 5

Special: Zombies, when “killed” are not removed from play. Each round after death, the controlling coach can roll 1d6 for each dead zombie. On a roll of “1”, the zombie re-awakens with 1d6 hit points.

Witchdoctors can cast one curse during the course of the game. This curse knocks 1d6 points from a designated target’s BT, CD or PK score (witchdoctor’s choice).

THE EXILES
The final “faction” are the exiles – members of other factions who have been cast out for breaking one taboo or another. A team of exiles can choose its members from any of the other four factions, but must still have 5 basic players and only 4 special players.

Unfortunately, exiles don’t become exiles because they work and play well with others. Any time a member of one faction is adjacent to the member of another faction on his same team, and not adjacent to an opposing team member, he or she must roll 1d6. On a “1”, the player attacks the old rival with a TACKLE and otherwise loses his or her turn.

SAMPLE TEAM OF EXILES
So, why not throw together a sample team of exiles to test things out. My 9 player team looks as follows:

#1 Boris the Zombie: HP 26; BT 8; CD 3; PK 4; MV 3; Special: Revive.

#2 Una the Amazon: HP 1; BT 1; CD 2; PK 4; MV 5; Special: None.

#3 Ook the Caveman: HP 26; BT 6; CD 1; PK 2; MV 5; Special: None.

#4 Sherp the Lizard Man: HP 29; BT 7; CD 1; PK 4; MV 4; Special: None.

#5 Bela the Zombie: HP 15; BT 5; CD 0; PK 1; MV 3; Special: Revive.

#6 Aurora the Acrobat: HP 13; BT 4; CD 3; PK 2; MV 6; Special: Leap.

#7 Tawa the Witch Doctor: HP 3; BT 0; CD 2; PK 3; MV 5; Special: Curse.

#8 Urg the Cave Ape: HP 11; BT 4; CD 4; PK 3; MV 4; Special: Fear.

#9 Vexxs the Troglodyte: HP 26; BT 8; CD 3; PK 1; MV 4; Special: Stench.

Looks like Una is going to be my default passer, but she’s going to have to be protected – Jim McMahon could take a hit better than her. Urg is a little disappointing as a cave ape, but on the whole it looks like I have some pretty stout bruisers on my team – they may be able to outlast their opponents if they can’t outplay them.

TOMORROW
The game rules for Cave Brawl!

Image of amazon from PARS FORTUNA, drawn by Mike Stewart.


Other images by Jeff Preston, used via Creative Commons Attribution 3.0 Unported License

Thor Dee-Lite!

A few months back I posted about backing Jeff Dee’s project of re-producing his old TSR art that was apparently thrown away (God, to back in time to that day and dumpster dive!). A couple weeks ago I got this spiffy signed print of Anubis.

Today, he announced the re-creation of his drawings for the Norse mythos, and with the $20 level getting you a signed print of Thor – the drawing that made me a lifelong fan of the thunder god – I had to jump in. Should look good next to old Jackal-head when I get them both framed.

I love me some Kickstarter. It helped give birth to Mystery Men! and many other worthy old school endeavors. Long may it reign.

Okay – in a couple hours I’ll post those Cave Brawl teams. Until then, have fun …

Are You Ready for Some Cave Brawl?

This idea sort of popped into my head the other day, so I ran with it …

Every year, in the Lost Valley of Dinosaurs, the various tribes and clans gather at the ancient stone arena to pay tribute to Ungawa, the Great God of the Valley. This involves a sacred religious observance in the form of a ball game, in which the various factions of the Valley test themselves in the arena, with the losers “passing through the sacred fire” to visit Ungawa in person. Strangely, most folk in the Valley prefer to avoid this particular honor.

Ungawa!

The arena is a square pit, about 21 yards wide by 21 yards long and 30 feet deep. Four caves open into this pit. Two serve as the respective goals of the two teams that compete in the game, the other two link to animal pits, just in case Ungawa is feeling a bit squirrely and wants to spice up the game.

On the board above, the light squares represent the team goals, the black squares the caves to the animal pits.

The goal is simple – put the ball into the other team’s goal area. This can be done by carrying the ball physically into the opponent’s goal area, or kicking the ball into a fairly small hole (about 3-ft in diameter) located about 20 feet above the pit floor and directly above the other team’s goal cave. Carrying the ball over the goal is worth a single point – three points wins the game. Kicking the ball into a hole wins the game outright!

Tomorrow: The Teams – Amazons, Cavemen, Reptilians and Witchdoctors!

Dragons in Blood and Treasure

While this is a preview of the dragon stats in Blood and Treasure, it is really more of a question that I’m posing to you, the reader, about the format of the monster chapter in the book.

Initially, I intended to do a fairly straightforward layout – monster name followed by a little table of stats and then the monster description. The same basic layout that has been used for generations in fantasy RPG’s, from Moldvay to the various Monster Manuals.

Yesterday, I started thinking about doing something a bit different – somewhat inspired by the layout that I think they used in the earliest versions of the game – a table grouping all of the monster stats together, and then the monster descriptions below that.


You’ll notice some silhouettes of monsters from Telecanter, the most excellent master of silhouettes in the OSR blog community, if not the world, to show the size comparison.

I decided to give it a whirl using the monsters of the “dragon” type in the game. It still needs a little work (I need to include the organization information for the monsters – probably as a line beneath the description), and I need to play with the stats a bit, but I think it just might work. Printed out, it is very readable, and might make scanning for stats a little easier for the busy Referee.

What do you think?